import sys
from functools import cmp_to_key
input = sys.stdin.readline
defcmpDic(a,b):if(a[1]<b[1]):
return1elif (a[1]>b[1]):
return -1if(len(a[0])<len(b[0])):
return1elif(len(a[0])>len(b[0])):
return -1if a>b:
return1else:
return -1
N, M= map(int,input().split())
res={}
for i inrange(N):
a=input().rstrip()
if(len(a)<M):
continueif(a in res):
res[a]+=1else:
res[a]=1
res = [(k, v) for k, v in res.items()]
res.sort(key=cmp_to_key(cmpDic))
for i,j in res:
print(i)
그 다음은 엔터를 눌러 계속 기본값으로 넘어가다가 “Set up automatic builds and deploy with Github?” 라는 질문에서 ci/cd 구축을 위해 yes를 입력해준다.
그러면 깃허브 로그인 창이 떠오르게 된다.
깃허브 로그인을 성공하면 ci/cd를 연결할 user/repository를 입력한다.
그 후에는 계속 엔터를 쳐주다가 What is the name of the GitHub branch associated with your site's live channel?이라는 질문에서 배포할 브랜치 이름을 적어준다.
그 다음 터미널에 뜬 url을 들어가서 해당 레포의 firebase CLI를 Revoke 해준다.
i  Action required: Visit this URL to revoke authorization for the Firebase CLI GitHub OAuth App:
https://github.com/settings/**********
이렇게 되면 기본적인 설정이 완료되고 .github에 yml파일이 생기고 깃허브 레포에는 github action이 추가된다.
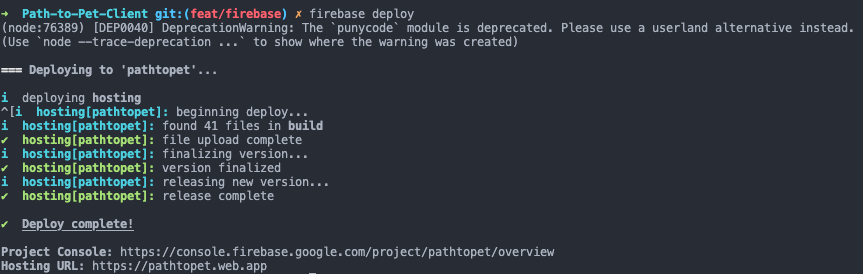
이 작업까지 완료하면 수동으로 직접 배포하는 것도 가능하다
npm run build

firebase deploy
github action을 사용한 ci/cd 연결
기본적으로 firebase와 github를 연결하게 된다면 두가지의 yml 파일이 생기게 된다.
firebase-hosting-merge.yml
지정한 브랜치가 병합될 때 마다 자동으로 Firebase Hosting으로 배포
# This file was auto-generated by the Firebase CLI# https://github.com/firebase/firebase-toolsname:DeploytoFirebaseHostingonmerge'on':push:branches:-mainjobs:build_and_deploy:runs-on:ubuntu-lateststeps:-uses:actions/checkout@v4-uses:FirebaseExtended/action-hosting-deploy@v0with:repoToken:'${{ secrets.GITHUB_TOKEN }}'firebaseServiceAccount:'${{ secrets.FIREBASE_SERVICE_ACCOUNT_PATHTOPET }}'channelId:liveprojectId:pathtopet
firebase-hosting-Pull-Request
PR을 올릴 때 Firebase Hosting에 대한 미리보기 버전을 자동으로 배포하는 것
# This file was auto-generated by the Firebase CLI# https://github.com/firebase/firebase-toolsname:DeploytoFirebaseHostingonPR'on':pull_requestjobs:build_and_preview:if:'${{ github.event.pull_request.head.repo.full_name == github.repository }}'runs-on:ubuntu-lateststeps:-uses:actions/checkout@v4-uses:FirebaseExtended/action-hosting-deploy@v0with:repoToken:'${{ secrets.GITHUB_TOKEN }}'firebaseServiceAccount:'${{ secrets.FIREBASE_SERVICE_ACCOUNT_PATHTOPET }}'projectId:pathtopet
yml파일에 대한 간단한 내용정리
name: 워크플로우의 이름
'on': 이 워크플로우가 어떤 GitHub 이벤트에 의해 트리거될지 정의
jobs: 워크플로우에서 실행할 작업을 정의
if: 조건문으로, 이 작업이 실행될 조건을 지정 여기서는 pull request가 현재 저장소에서 생성된 것인지 확인.
${{ github.event.pull_request.head.repo.full_name == github.repository }} 이 조건은 pull request가 포크(fork)된 저장소가 아닌 원본 저장소에서 생성됐을 때만 작업을 실행하도록 한다.
runs-on: 작업이 실행될 환경을 지정
steps: 작업을 구성하는 단계들. 이 단계들은 순차적으로 실행
actions/checkout@v4: GitHub Action이 현재 저장소의 코드를 체크아웃하여 작업 실행 환경에 가져온다.
FirebaseExtended/action-hosting-deploy@v0: Firebase Hosting으로 배포를 담당하는 GitHub Action
import sys
sys.setrecursionlimit(1000000)
def dfs(land, i, j, m, n, check, patch_id):
if i < 0 or i >= m or j < 0 or j >= n or check[i][j] != 0 or land[i][j] == 0:
return0check[i][j] = patch_id
size = 1size += dfs(land, i + 1, j, m, n, check, patch_id)
size += dfs(land, i - 1, j, m, n, check, patch_id)
size += dfs(land, i, j + 1, m, n, check, patch_id)
size += dfs(land, i, j - 1, m, n, check, patch_id)
return size
def solution(land):
m = len(land)
n = len(land[0])
check = [[0] * n for _ in range(m)]patch_sizes = {}
patch_id = 1for i in range(m):
for j in range(n):
if land[i][j] == 1 and check[i][j] == 0:
patch_size = dfs(land, i, j, m, n, check, patch_id)
patch_sizes[patch_id] = patch_size
patch_id += 1max_oil = 0for j in range(n):
oil_in_column = set()
for i in range(m):
if check[i][j] != 0:
oil_in_column.add(check[i][j])
total_oil = sum(patch_sizes[pid] for pid in oil_in_column)
max_oil = max(max_oil, total_oil)
return max_oil
풀이
일자로 팠을 때 석유를 최대한 많이 얻는 경우는?
우선 땅에 있는 모든 석유 웅덩이를 dfs로 확인하여 1,2,3 라벨과 넓이를 붙여준다.
그 뒤 땅을 한번씩 돌면서 일자로 팠을 때 시추 가능한 양을 체크하면서 최대로 시추 가능한 곳의 양을 max_oil에 저장하고 리턴한다.
특이사항
우선 정확성은 전부 통과했는데 효율성에러 런타임 에러가 나서 왜그런가 하고 생각해봤는데, 파이썬의 재귀 제한 때문에 오류가 나는것을 파악해서 재귀 허용을 늘려주면 통과한다. (기본 재귀 1000번)
import sys sys.setrecursionlimit(1000000)
원래는 매 시행때 dfs를 돌면서 계속 체크를 하려고 했다가 그렇게 되면 효율성을 통과하지 못할거라고 생각하고 미리 dfs로 모든 석유의 라벨링을 해주며 진행했다.
N = int(input())
coordinate=[]
for i inrange(N):
coordinate.append(tuple(map(int,input().split())))
max_x = max(coord[0] for coord in coordinate)
max_y = max(coord[1] for coord in coordinate)
grid = [[0for _ inrange(max_x)] for _ inrange(max_y)]
for x, y in coordinate:
for i inrange(y):
grid[i][x - 1] = 1
grid.reverse()
res=0for i inrange(len(grid)):
if(grid[i].count(1)==0):
continueif(grid[i].count(1)==1):
res+=1continue
front_index = grid[i].index(1) + 1
back_index = len(grid[i]) - grid[i][::-1].index(1)
res+=back_index-front_index+1print(res)
import sys
input = sys.stdin.readline
m, n =map(int,input().rstrip().split())
keyword = {}
unUse=m
for i inrange(m):
keyword[input().rstrip()]=Falsefor i inrange(n):
memo = input().rstrip().split(',')
for j in memo:
if(j in keyword):
if(not keyword[j]):
keyword[j]+=True
unUse-=1print(unUse)
풀이
사용되지 않은 키워드의 개수를 구해라
키워드를 입력받아 딕셔너리 키워드:0 형태로 만들어준다.
unUse , 사용되지 않은 키워드의 개수를 세는 변수는 만들어준다
블로그에 사용한 키워드를 memo에 입력받고, 언급된 키워드들을 제거해준다.
keyword에 없는 단어들은 체크하지 않는다.
keyword에 있는데 value가 False이 아닌 단어는 이미 한번 이상 사용된 단어이므로 넘어간다.
keyword에 있는 단어인데 value가 False인경우 사용하지 않은 단어이므로 True로 바꿔준 후 unUse-=1을 해준다