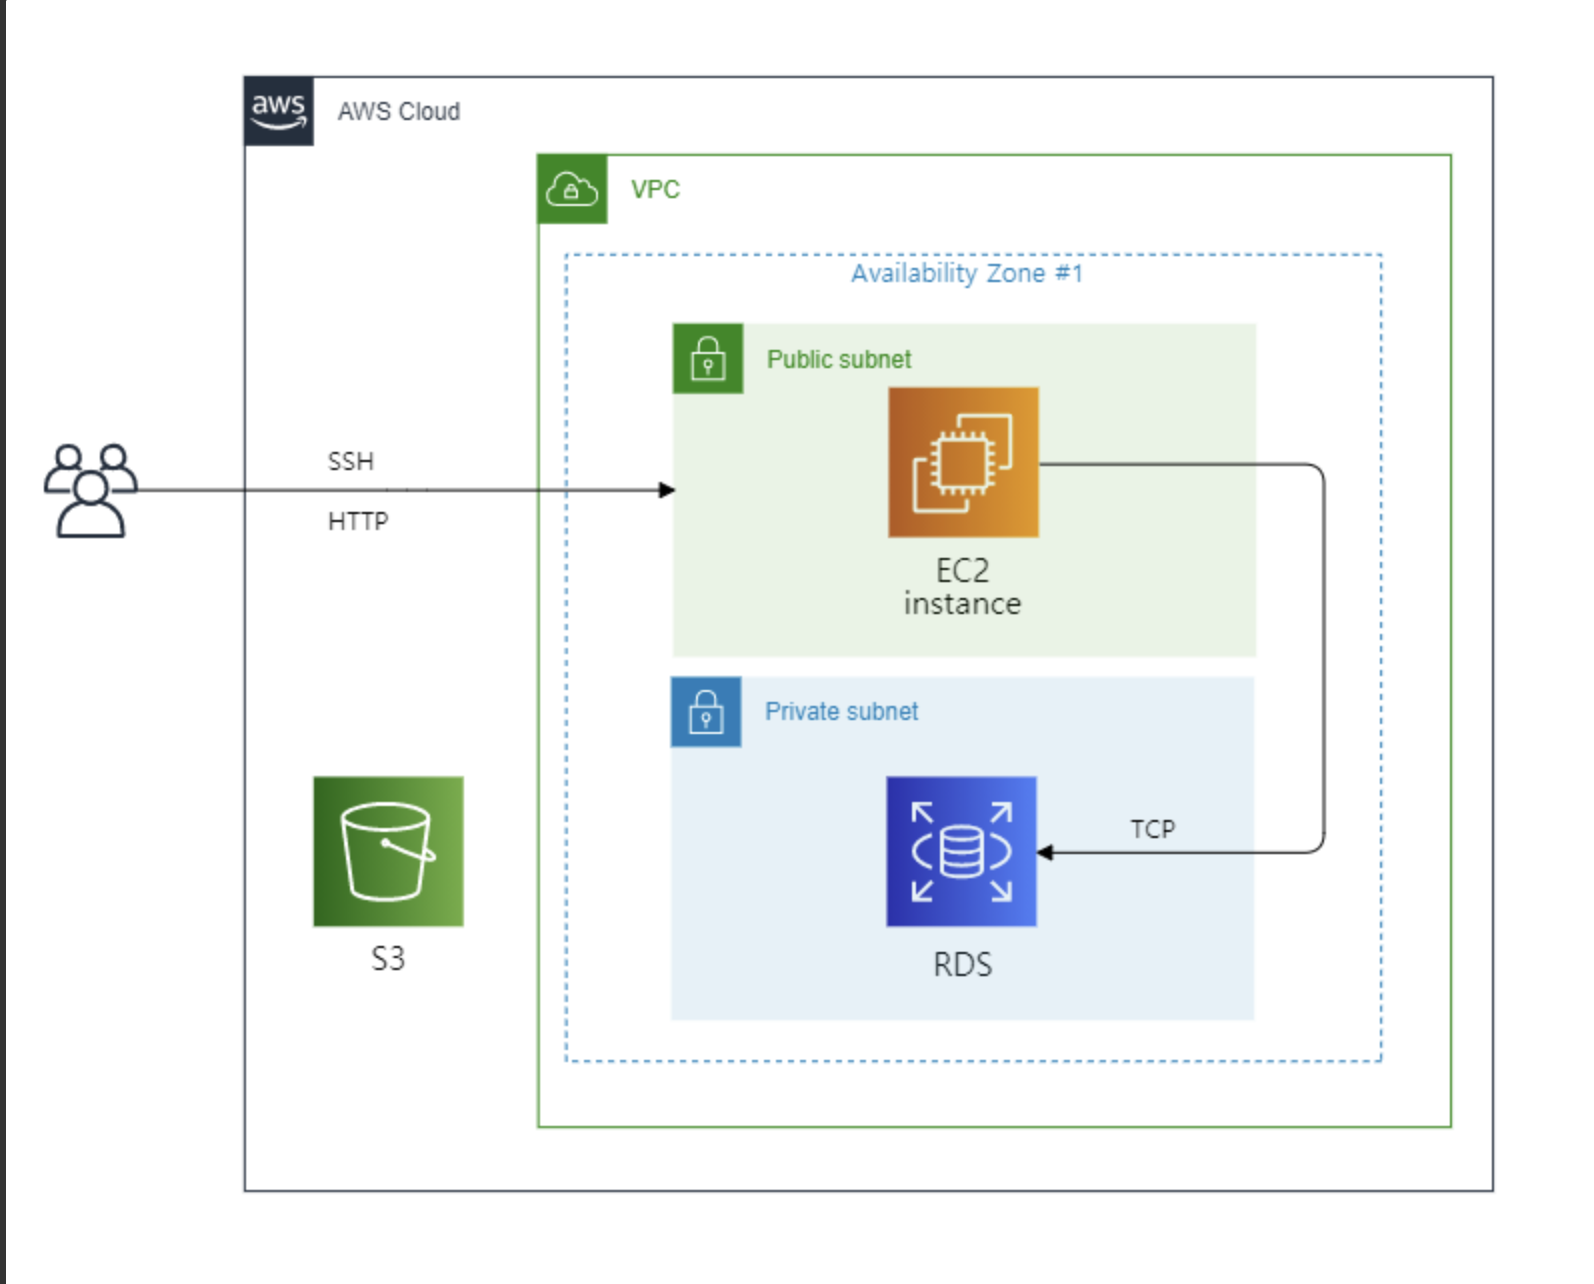
구성도

이런 형태로 구축하려고 한다.

서브넷 추가하기

#vpc.tf
#퍼블릭 서브넷
resource "aws_subnet" "realPublicSubnet" {
    vpc_id = aws_vpc.realVPC.id
    cidr_block = "10.0.0.0/24"
    availability_zone = "ap-northeast-2c"
    tags = {
        Name = "real-public-subnet"
    }
}
#프라이빗 서브넷
resource "aws_subnet" "realPrivateSubnet1" {
    vpc_id = aws_vpc.realVPC.id
    cidr_block = "10.0.1.0/24"
    availability_zone = "ap-northeast-2c"
    tags = {
        Name ="real-private-subnet1"
    }
}
resource "aws_subnet" "realPrivateSubnet2" {
    vpc_id = aws_vpc.realVPC.id
    cidr_block = "10.0.2.0/24"
    availability_zone = "ap-northeast-2a"
    tags = {
        Name = "real-private-subnet2"
    }
}
  • vpc_id 부분에 바로전에 만들었던 vpc의 id를 추가하면 쉽게 서브넷을 추가할 수 있다.
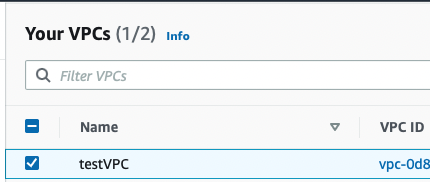
  • 아까 만들었던 이름을 사용해서 id를 쉽게 얻을 수 있다. (aws_vpc.testVPC.id)

IGW (인터넷 게이트웨이 추가)

# vpc.tf
resource "aws_internet_gateway" "realIGW" {
    vpc_id = aws_vpc.realVPC.id
    tags = {
        Name="real-IGW"
    }
}
  • vpc에서 외부와 통신할 수 있게 public subnet과 통신한 인터넷 게이트웨이를 추가한다.

라우팅 테이블 작성

#vpc.tf
##라우팅 테이블 만들기
#퍼블릭 라우팅 테이블
resource "aws_route_table" "realPublicRoute" {
    vpc_id = aws_vpc.realVPC.id
    route {
        cidr_block = "0.0.0.0/0"
        gateway_id = aws_internet_gateway.realIGW.id 
            #퍼블릭 서브넷에 인터넷 게이트웨이 연결.
    }
    tags = {
    Name = "real-public-route"
    }
}
#프라이빗 라우팅 테이블
resource "aws_route_table" "realPrivateRoute" {
    vpc_id = aws_vpc.realVPC.id
    tags = {
        Name = "real-private-route"
    }
}

#퍼블릭 라우팅 테이블 연결
resource "aws_route_table_association" "realPublicRTAssociation"{
    subnet_id = aws_subnet.realPublicSubnet.id
    route_table_id = aws_route_table.realPublicRoute.id
}

#프라이빗 라우팅 테이블 연결
resource "aws_route_table_association" "realPrivateRTAssociation1"{
    subnet_id = aws_subnet.realPrivateSubnet1.id
    route_table_id = aws_route_table.realPrivateRoute.id
}
resource "aws_route_table_association" "realPrivateRTAssociation2"{
    subnet_id = aws_subnet.realPrivateSubnet2.id
    route_table_id = aws_route_table.realPrivateRoute.id
}
  • 다음으로는 라우팅 테이블을 만들어 서브넷과 연결시켜준다.

보안그룹 생성

#vpc.tf
#퍼블릭 보안 그룹
resource "aws_security_group" "realPublicSG" {
    vpc_id = aws_vpc.realVPC.id
    name = "real public SG"
    description = "real public SG"
    tags = {
        Name = "real pulbic SG"
    }

}
#퍼블릭 보안 그룹 규칙
resource "aws_security_group_rule" "realPublicSGRulesHTTPingress" {
    type = "ingress"
    from_port = 80
    to_port=80
    protocol = "TCP"
    cidr_blocks = ["0.0.0.0/0"]
    security_group_id = aws_security_group.realPublicSG.id
    lifecycle{
        create_before_destroy = true
    }
}
resource "aws_security_group_rule" "realPublicSGRulesSSHingress" {
    type = "ingress"
    from_port = 22
    to_port= 22
    protocol = "TCP"
    cidr_blocks=["0.0.0.0/0"]
    security_group_id = aws_security_group.realPublicSG.id
    lifecycle{
        create_before_destroy = true
    }
}
resource "aws_security_group_rule" "realPublicSGRulesALLegress" {
    type = "egress"
    from_port = 0
    to_port= 0
    protocol = "ALL"
    cidr_blocks=["0.0.0.0/0"]
    security_group_id = aws_security_group.realPublicSG.id
    lifecycle{
        create_before_destroy = true
    }
}
#프라이빗 보안 그룹
resource "aws_security_group" "realPrivateSG" {
    vpc_id = aws_vpc.realVPC.id
    name = "real private SG"
    description = "real private SG"
    tags = {
        Name = "real private SG"
    }
}
#프라이빗 보안 그룹 규칙
resource "aws_security_group_rule" "realPrivateSGRulesRDSingress" {
    type = "ingress"
    from_port = 3306
    to_port=3306
    protocol = "TCP"
    security_group_id = aws_security_group.realPrivateSG.id
    source_security_group_id = aws_security_group.realPublicSG.id
    lifecycle{
        create_before_destroy = true
    }
}
resource "aws_security_group_rule" "realPrivateSGRulesRDSegress" {
    type = "egress"
    from_port = 3306
    to_port= 3306
    protocol = "TCP"
    security_group_id = aws_security_group.realPrivateSG.id
    source_security_group_id = aws_security_group.realPublicSG.id
    lifecycle{
        create_before_destroy = true
    }
}
  • public, private subnet의 보안그룹을 생성해준다.

    • public의 경우 ssh접속을 위한 22번 포트와, http 통신을 위한 80를 ingress로, 열어주고 외부로 나가는 egress는 모든 트래픽을 열어준다.
    • private의 경우 rds를 연결하기 위해 3306포트를 열어준다.
  • 테라폼에서는 보안 그룹을 설정할 때 인라인으로 규칙을 추가해주거나 aws_security_group_rule
    으로 추가할 수 있음.

  • 만약 인라인으로 지정하게 된다면 한 보안 그룹에서 인바운드로 허용하는 액세스원이 다른 보안 그룹인 경우 이를 지정 할 수 없다.
    => aws_security_group_rule를 사용해서 추가해주자.

  • ingress는 외부에서 내부로 들어오는 트래픽, egress는 내부에서 외부로 나가는 트래픽을 의미.

계획 및 적용

$ terraform plan
.
.
.
Plan: 16 to add, 0 to change, 0 to destroy.
$ terraform apply

Do you want to perform these actions?
  Terraform will perform the actions described above.
  Only 'yes' will be accepted to approve.

  Enter a value: yes

aws_security_group.testPrivateSG: Creating...
aws_route_table.testPrivateRoute2: Creating...
aws_route_table.testPrivateRoute1: Creating...
aws_route_table.testPublicRoute: Creating...
aws_security_group.testPublicSG: Creating...
aws_route_table.testPrivateRoute2: Creation complete after 1s [id=rtb-01a08a475c7aa3b6e]
aws_route_table_association.testPrivateRTAssociation2: Creating...
aws_route_table.testPrivateRoute1: Creation complete after 1s [id=rtb-0de978f9daf7138da]
aws_route_table_association.testPrivateRTAssociation1: Creating...
aws_route_table_association.testPrivateRTAssociation2: Creation complete after 0s [id=rtbassoc-04c687539b690b97e]
aws_route_table_association.testPrivateRTAssociation1: Creation complete after 0s [id=rtbassoc-00c81afb4d66a4afb]
aws_route_table.testPublicRoute: Creation complete after 1s [id=rtb-0b21780b54c48f288]
aws_route_table_association.testPublicRTAssociation: Creating...
aws_route_table_association.testPublicRTAssociation: Creation complete after 1s [id=rtbassoc-015a0b583a70d3d07]
aws_security_group.testPrivateSG: Creation complete after 2s [id=sg-0564ca6903f5d71ae]
aws_security_group.testPublicSG: Creation complete after 2s [id=sg-0d17e51c8f54212ee]
aws_security_group_rule.testPublicSGRulesHTTPegress: Creating...
aws_security_group_rule.testPrivateSGRulesRDSegress: Creating...
aws_security_group_rule.testPublicSGRulesHTTPSingress: Creating...
aws_security_group_rule.testPublicSGRulesHTTPSegress: Creating...
aws_security_group_rule.testPublicSGRulesHTTPingress: Creating...
aws_security_group_rule.testPublicSGRulesSSHegress: Creating...
aws_security_group_rule.testPrivateSGRulesRDSingress: Creating...
aws_security_group_rule.testPublicSGRulesSSHingress: Creating...
aws_security_group_rule.testPublicSGRulesSSHegress: Creation complete after 1s [id=sgrule-1099277773]
aws_security_group_rule.testPrivateSGRulesRDSegress: Creation complete after 1s [id=sgrule-640893485]
aws_security_group_rule.testPublicSGRulesHTTPSingress: Creation complete after 1s [id=sgrule-1338266698]
aws_security_group_rule.testPrivateSGRulesRDSingress: Creation complete after 1s [id=sgrule-3779608258]
aws_security_group_rule.testPublicSGRulesHTTPingress: Creation complete after 2s [id=sgrule-768399379]
aws_security_group_rule.testPublicSGRulesHTTPSegress: Creation complete after 2s [id=sgrule-292654581]
aws_security_group_rule.testPublicSGRulesSSHingress: Creation complete after 3s [id=sgrule-1743733607]
aws_security_group_rule.testPublicSGRulesHTTPegress: Creation complete after 3s [id=sgrule-3303017385]

Apply complete! Resources: 16 added, 0 changed, 0 destroyed.

이런식으로 적용이 완료 되면 성공이다.

테라폼 사용하기

테라폼 공식 레퍼런스
-> 필요한 프로바이더, 리소스등을 어떻게 사용하는 상세히 나와 있다. 모르는거 있을때 참고하면 좋다.

테라폼 작동방식

  • 프로바이더 작성
    무엇을 사용해서 인프라를 구성할 지 결정 ex)aws, 구글 클라우드 서비스 등

  • 초기화 (init)
    terraform init 명령어를 통해 테라폼을 사용할 수 있게 기본적인 설정 진행.

  • 리소스 작성
    사용하고 싶은 리소스를 .tf 파일로 작성

  • 계획 / 적용 (plan/apply)
    terraform plan : 작성한 리소스들이 실제로 어떻게 만들어질지 예측 및 결과를 보여줌 (실제로 만드는 건 아님)
    terraform apply : 작성한 리소스들을 바탕으로 실제 인프라를 생성함.

프로바이더 작성

사용하게 될 서비스(aws, gcp, docker 등)를 작성

  • 사용할 디렉토리 생성.
    mkdir [디렉토리 이름]
$ mkdir test
  • 그 후 .tf파일 작성
#main.tf (파일명은 상관 없음. 본인이 알아볼 수 있는 이름으로 설정.)
terraform {
  required_version = "1.2.9" #자신의 terraform 버전으로 설정.

  required_providers {
      aws = { #사용할 프로바이더 aws 설정.
          source = "hashicorp/aws" #저장 경로.
          version = "~> 3.0" #버전 설정
      }
  }
}

provider "aws" {
  region     = "ap-northeast-2" #aws의 리전 설정. ap-northeast-2는 서울리전.
  # access_key 와 secert_key 를 파일에 적어서 구현할 수는 있지만 권장안함.
  # 보안이슈로 파일에 직접적는것보단 export나 위의 configure로 설정하는 것이 좋음.
  # access_key = "my-access-key"
  # secret_key = "my-secret-key"
}

key 부분은 전 게시물에 aws CLI를 설정했으면 넘어가도 된다.
(그리고 파일에 key값을 명시하는 것은 보안상의 이유로 추천하지 않는다.)

초기화

  • 파일 작성 후 terraform init 명령어를 통해 초기화
    $ terraform init
    Terraform has been successfully initialized!
    ##블라블라 하면서 초록색으로 성공적으로 초기화되었습니다! 뜸

    만약 프로바이더의 tf파일의 변경사항이 있을 경우
    terraform init -upgrade 해주면 마지막 변경사항으로 업데이트 된다.

리소스 작성

EC2, RDS 등 실제로 구축하게 될 자원들을 작성해야한다.

  • vpc 생성으로 테스트 해보기
#vpc.tf
resource "aws_vpc" "testVPC"{
    cidr_block = "10.0.0.0/16"
    enable_dns_hostnames = true
}

리소스의 경우 .tf 형식을 가지며 한파일에 전부 있어도 되고, 여러개로 나눠져있어도 된다. (위의 vpc.tf파일의 내용이 제일 위에 만들었던 provider.tf에 있어도 상관없음.
보통은 사용하는 aws 리소스별로 나눈다.

계획/적용

계획 (plan) : 실제 적용하기 전 코드를 테스트 해보는 것.
적용 (apply) : 실제 환경에 적용한다.

  • 위의 vpc.tf 파일을 생성했으면 plan 명령어를 사용한다.
$ terraform plan

Terraform used the selected providers to generate the following execution plan.
Resource actions are indicated with the following symbols:
  + create

Terraform will perform the following actions:

  # aws_vpc.testVPC will be created
  + resource "aws_vpc" "testVPC" {
      + arn                                  = (known after apply)
      + cidr_block                           = "10.0.0.0/16"
      + default_network_acl_id               = (known after apply)
      + default_route_table_id               = (known after apply)
      + default_security_group_id            = (known after apply)
      + dhcp_options_id                      = (known after apply)
      + enable_classiclink                   = (known after apply)
      + enable_classiclink_dns_support       = (known after apply)
      + enable_dns_hostnames                 = (known after apply)
      + enable_dns_support                   = true
      + id                                   = (known after apply)
      + instance_tenancy                     = "default"
      + ipv6_association_id                  = (known after apply)
      + ipv6_cidr_block                      = (known after apply)
      + ipv6_cidr_block_network_border_group = (known after apply)
      + main_route_table_id                  = (known after apply)
      + owner_id                             = (known after apply)
      + tags_all                             = (known after apply)
    }

Plan: 1 to add, 0 to change, 0 to destroy.

이런식으로 출력되면 plan이 성공한 것이다.

👉 이런 에러가 출력될때가 있다.
An argument or block definition is required here. To set an argument, use the │ equals sign "=" to introduce the argument value.
이건 복사/붙여넣기로 파일 만들었을때 문자가 깨져서 나오는 것이므로 .tf파일을 직접 손으로 작성한 후 다시 plan할 것.

  • plan에 성공했을 경우 apply 명령어를 사용한다.
$ terraform apply

Terraform used the selected providers to generate the following execution plan.
Resource actions are indicated with the following symbols:
  + create

Terraform will perform the following actions:

  # aws_vpc.testVPC will be created
  + resource "aws_vpc" "testVPC" {
      + arn                                  = (known after apply)
      + cidr_block                           = "10.0.0.0/16"
      + default_network_acl_id               = (known after apply)
      + default_route_table_id               = (known after apply)
      + default_security_group_id            = (known after apply)
      + dhcp_options_id                      = (known after apply)
      + enable_classiclink                   = (known after apply)
      + enable_classiclink_dns_support       = (known after apply)
      + enable_dns_hostnames                 = (known after apply)
      + enable_dns_support                   = true
      + id                                   = (known after apply)
      + instance_tenancy                     = "default"
      + ipv6_association_id                  = (known after apply)
      + ipv6_cidr_block                      = (known after apply)
      + ipv6_cidr_block_network_border_group = (known after apply)
      + main_route_table_id                  = (known after apply)
      + owner_id                             = (known after apply)
      + tags_all                             = (known after apply)
    }

Plan: 1 to add, 0 to change, 0 to destroy.

Do you want to perform these actions?
  Terraform will perform the actions described above.
  Only 'yes' will be accepted to approve.

  Enter a value: yes #yes를 입력해줘야 한다.

aws_vpc.testVPC: Creating...
aws_vpc.testVPC: Creation complete after 2s [id=vpc-0d827147de6c34491]

Apply complete! Resources: 1 added, 0 changed, 0 destroyed.

apply의 경우 실제로 환경에 적용하는 것이므로 진짜 적용할건지 한번 더 물어본다. yes를 입력해주면 적용한다.

여기까지 완료했으면 aws console을 가서 확인해보자. 새로운 vpc가 생긴것을 확인할 수 있다.


내용을 변경하고 싶으면 내용 변경 후 plan->apply를 반복하면 된다.

#vpc.tf
resource "aws_vpc" "testVPC"{
    cidr_block = "10.0.0.0/16"
    enable_dns_hostnames = true
    tags = {
        Name="testVPC" # 콘솔에서 표시될 이름 지정
    }
}

이렇게 이름을 추가 후 plan/apply를 한 후 콘솔을 확인해보면 이름이 지정된 것을 확인할 수 있다.

AWS CLI 설치

AWS CLI 설치 페이지

  • 위 페이지에서 나에게 맞는 운영체제의 AWS CLI 설치 가능.
    (mac의 경우 GUI installer의 pkg를 사용하여 쉽게 설치 가능)
  • 설치 후 경로와 버전 확인
$ which aws
/usr/local/bin/aws

$ aws --version
aws-cli/2.7.31 Python/3.9.11 Darwin/21.5.0 exe/x86_64 prompt/off

제대로 경로와 버전이 뜬다면 설치 성공.

AWS CLI 사용을 위한 설정

  • key pair 생성 및 .csv 파일을 이용한 키 페어 가져오기
  1. AWS 콘솔에 로그인 후 IAM 서비스로 이동.
  2. 서비스 이동 후 왼쪽의 users 탭 클릭.
  3. 키페어 생성할 user name 클릭.
  4. Security credentials(보안 자격) 탭 클릭.
  5. create access key 버튼 클릭.

중요! 단 한번만 생성할때 secret access key와 .csv파일을 다운받을 수 있음. 꼭 복사해두거나 저장해둘것.

$ aws configure
AWS Access Key ID [None]: 
AWS Secret Access Key [None]: 
Default region name [None]: ap-northeast-2
Default output format [None]: json
  • 총 4개의 설정값이 나옴.
  • 위에서 얻은 access key id와 key를 입력.
  • Default region name은 기본으로 사용할 리전을 입력 (서울의 경우 ap-northeast-2)
  • Default output format은 기본 출력 형식 (json, yaml, yaml-stream, text, table 중 하나나 선택, 지정안하면 json이 기본값)
  • aws configure list 명령어 사용하면 현재 구성정보 한눈에 확인 가능.

여기까지 하면 테라폼 설치 전 AWS CLI 환경 설정 완료!

테라폼이란?

모든 클라우드에서 인프라 자동화
모든 환경에서 리소스를 프로비저닝, 변경 및 버전 관리합니다.
출처 : https://www.terraform.io (공식홈페이지 소개글)

IaC

Infrastructure as Code, 코드로써의 인프라

즉 코드로써의 인프라는 인프라를 이루는 서버, 미들웨어 그리고 서비스 등 인프라 구성요소들을 코드를 통해 구축하는 것이다.
terraform은 이 IaC의 하나로 인프라를 코드로 구축하기 때문에 작성하기 편리하고, 재사용과 유지보수가 쉽다는 장점을 가진다.

구성요소

테라폼은 다음 5가지의

  • provider
    테라폼으로 생성할 인프라의 종류(aws, 구글 클라우드 서비스 등)

      required_providers {
          aws = { #사용할 프로바이더 aws 설정.
              source = "hashicorp/aws" #저장 경로.
              version = "~> 3.0" #버전 설정
          }
    
  • resource
    테라폼으로 생성할 인프라의 자원(aws라고 하면 ec2, vpc 등)
    .tf의 확장자로 생성한다.

    #create a vpc
    resource "aws_vpc" "example" { 
    #"aws_vpc"는 사용하는 자원, "example"은 내가 사용할 이름을 뜻한다.
    #여기서 "example"이란 이름은 내가 테라폼에서 사용하는 이름으로, aws 콘솔에서 표시되는 이름이 아니다.
        tags = {
            Name = "example" #aws 콘솔에 표시되는 이름은 이렇게 tags안의 Name으로 설정한다.    
        }
        cidr_block = "10.0.0.0/16"
        #이외에도 수많은 인자 존재.
    }
  • state
    테라폼을 통해 생성한 자원의 상태 (file로 저장됨)

    {
      "version": 4,
      "terraform_version": "1.2.9",
      "serial": 222,
      "lineage": "9xxxxxxx-fxxx-e80b-2c13-a1bf59bd6bb2",
      "outputs": {},
      "resources": [
            {...},
            {...},
        ]
    }

    단, state는 현재 인프라의 상태가 아닌 테라폼으로 생성한 결과다. (만약 콘솔이나 다른작업으로 상태가 바뀌어도 state는 업데이트 되지 않는다.)

  • output
    테라폼으로 만든 자원을 변수 형태로 state에 저장하는 것을 의미

    resource "aws_vpc" "default" {
        cidr_block = "10.0.0.0/16"
        # cidr_block 이외에도 수많은 인자가 존재합니다.
    }
    
    output "vpc_id"{
        value = aws_vpc.default.id
    }
    
    output "cidr_block"{
        value = aws_vpc.default.cidr_block
    }
  • module
    고통적으로 활용할 수 있는 코드를 문자 그대로 모듈 형태로 정의하는 것을 의미
    (재사용성이 높음)

    module "vpc" {
        source = "../_modules/vpc" ##리소스 코드 경로
    
        cidr_block = "10.0.0.0/16"
    } 
  • remote
    다른 경로의 state를 참조함.

    data "terraform_remote_state" "vpc" {
        backend = "remote"
    
        config = {
            bucket = "terraform-s3-bucket"
            region = "ap-northeast-2"
            key = "terraform/vpc/terraform.tfstate"
        }
    }

주요 명령어

terraform init
테라폼 명령어 사용을 위해 각종 설정을 진행 (git init과 비슷한 역할)
terraform plan
테라폼으로 작성한 코드가 실제로 어떻게 만들어질지에 대한 예측 결과를 보여줌
terraform apply
테라폼 코드로 실제 인프라를 생성하는 명령어.
terrafrom import
이미 만들어진 자원을 테라폼 state 파일로 옮겨주는 명령어.
terraform state
테라폼 state를 다루는 명령어. 하위 명령어로 mv, push 등이 있음
terraform destroy
생성된 자원들 state 파일 모두 삭제하는 명령어. (백업 등의 설정을 안해놨으면 한번에 지워지니 조심해서 사용할 것.)

파이어베이스 프로젝트 생성

제일 처음 파이어베이스를 연동해주어야 함.

Sign in (클릭 시 파이어베이스로 이동)

  • 파이어 베이스 접속 후 로그인.
  • 프로젝트 추가 클릭
  • 프로젝트 이름 입력
  • 애널리틱스 건들지 않고 넘어가기
  • 기존의 계정 혹은 새 계정 만들고 선택 후 프로젝트 생성

firebase 프로젝트에 웹앱 추가

  • 앱 추가 클릭 후 웹 클릭
  • 이름 입력 후 다음 클릭
![](https://velog.velcdn.com/images/fdsa200/post/d0fab8aa-6c0b-4f51-9021-2b00dd0c3506/image.png)
  • sdk 설정에 있는 js 코드 복사

리엑트에 파이어베이스 추가

위에서 웹을 추가할 때 봤던 sdk설정에 있는 내용에 리엑트에 추가

  • 파이어 베이스 설치
npm install firebase
  • 설치 후 firebase.js 파일 하나 만들어서 위의 내용 복사&붙여넣기 (파일이름은 상관없음)

문제설명 (링크 참조)

문자열 압축

문자열의 반복되는 부분을 겹쳐서 제일 짧은 문자열을 만들어 리턴하라!

풀이

입력받은 문자열을 1~제일 크게 나눌 수 있을 때까지 나눠서 겹치는지 확인하는 문제

결국 최대 두개가 겹치는 건 길이의 1/2일때니깐 1~len(s//2) 까지 확인하면 된다.

1~len(s//2)까지 매 시행횟수에 초기값 설정.


초기값

  • arr=””
  • count=1
  • cur=s[0:i]

  • cur은 매 시행의 크기만큼 첫번째 문자열.
  • count는 현재 몇번 반복되었는지 확인

반복문을 돌면서 다음 조건을 통해 arr에 차례차례 담는다.

  1. cur과 같은 크기만큼 다음 문자열을 비교
  2. 같으면 count+=1 해주고 넘어감
  3. 다르면 count가 1이면 겹치는게 하나도 없는것이므로로 그냥 cur만 arr에 더해줌
    다르고 count가 1이 아니면 여러번 겹친것이므로 count+cur로 문자열에 더해줌

코드

def solution(s):
    answer=len(s)
    for i in range(1,len(s)//2+1):
        arr = ''
        count=1
        cur=s[0:i]
        for j in range(i,len(s),i):
            if(cur==s[j:j+i]):
                count+=1
            else:
                if(count==1):
                    arr+=cur
                else:
                    arr+=str(count)+cur
                    count=1
                cur=s[j:j+i]
        if(count==1):
            arr+=cur
        else:
            arr+=str(count)+cur

        if(answer>len(arr)):
            answer=len(arr)
    return answer

특이사항

  • 처음에 무조건 같은 크기로 나누는지 몰라서 엄청 어렵게 생각함.
    (1 + 3 + 3)이런식으로 나눠도 되는줄 알고 원래 난이도보다 훨씬 올려서 생각했다.
  • 문제를 잘 읽자...

문제설명 (링크 참조)

프로그래머스 튜플

입력받은 문자열을 확인하여 제대로 된 순서의 리스트로 변환 후 리턴

풀이

문제에서 입력받은 문자열 s에서 값들을 추출하는게 관건이었던 문제.

처음에는 리스트 형식으로 요소를 주는 줄 알았지만 하다보니 문자열로 준다는 것을 깨닫고 어떻게 문자열에서 각 요소들을 정리해서 추출할 수 있을까 고민을 많이 함.

  1. 우선 입력받은 s의 튜플 하나하나를 리스트로 바꿔준다.
  1. 리스트의 요소들을 str에서 int로 바꿔준다.
  • s[2:-2:].split('},{')를 해주면 { }전부 제외하고 각 튜플을 하나의 요소로 만들어 줄 수있다.
  • 그리고 for문을 돌며 각 요소를 다시 split(',')해주고 값들을 str에서 int로 바꿔주면 각각의 요소들을 얻을 수 있다.
  1. res 딕셔너리에 길이를 key로 저장해준다.

{{2},{2,1},{2,1,3},{2,1,3,4}} 이 문자열을
{1: [2], 2: [2, 1], 3: [2, 1, 3], 4: [2, 1, 3, 4]} 이런식으로 길이를 key값으로 얻을 수 있음.

  1. res를 반복문으로 돌면서 모든 배열의 요소를 확인하며 answer에 값을 넣어준다.


{{a1}, {a1, a2}, {a1, a2, a3}, {a1, a2, a3, a4}, ... {a1, a2, a3, a4, ..., an}} 의 형식이므로
res에서 길이가 1인(key값이 1인) value 부터 확인하면서 answer에 없을경우 요소 추가.

코드

def solution(s):
    res={}
    answer = []
    #입력받은 문자열은 인덱싱해서 리스트로 만들어줌
    arr=s[2:-2:].split('},{')
    for i in arr:
        a=i.split(',')
        #str을 int로 바꿔줌
        for j in range(len(a)):
            a[j]=int(a[j])
        res[len(a)]=a
    #크기가 1인 것 부터 확인하면서 answer배열에 안들어가 있으면 넣고 다음으로 넘어감.
    for i in range(1,len(res)+1):
        for j in range(len(res[i])):
            if(res[i][j] not in answer):
                answer.append(res[i][j])
                break
    return answer

특이사항

  • 다른사람풀이 보니까 여러 방법이 있는 것 같다. 정규표현식으로 한줄로 푼 괴수분을 보았다...
  • 또 정규표현식이 아니더라도 나처럼 굳이 딕셔너리를 쓰지않고 리스트를 sort해서 작성하신 분들도 보았다.

문제설명 (링크 참조)

프로그래머스 양궁 대회 문제

라이언이 어피치를 이기는 경우 중 낮은 점수를 더 많이 맞힌 경우를 리턴, 리턴 값은 10점 화살의 개수 부터 0점까지 리스트 형식으로 반환 한다.
ex [1,2,3,0,0,0,0,0,0,0,1]
단 어떠한 경우에도 못이기면 -1 리턴.

풀이

결국은 라이언이 어피치를 이기는 경우를 체크해주면 된다.

코드는 이런방법으로 작성했다.

  1. 우선 0~10의 화살을 쏠 수 있는 경우의 수를 조합을 이용해 뽑았다. (여기서 같은 점수를 여러번 맞힐 수 있으므로 중복이 가능하게 뽑아야 했다. 그래서 그냥 combinations가 아닌 combinations_with_replacement 사용.)
  2. 나온 경우의 수와 어피치의 과녁을 비교해서 라이언이 더 많이 맞힌 수는 라이언의 점수로, 어피치가 더많이 맞혔거나 같으면 어피치 점수로, 둘다 0이면 점수를 세지 않았다.

-> 여기서 여러발을 맞혀도 누적 점수가 아닌 과녁의 점수만 +해줘야한다.

  1. 점수를 체크한 뒤 라이언이 어피치보다 더 많은 점수를 획득했을 때, 가장 큰 차이로 이기는 경우를 찾아야 한다. 그래서 count 변수로 점수의 차이를 저장해놓고 현재 결과 점수가 count보다 클경우 c배열과 count 업데이트.
  2. 그렇게 찾은 조합을 점수로 변환한 후 answer에 넣어서 return

코드

from itertools import combinations_with_replacement
def solution(n, info):
    arr=[0,1,2,3,4,5,6,7,8,9,10]
    b=list(combinations_with_replacement(arr,n))
    # 가능한 모든 경우의 수를 중복 조합으로 구함.
    c=[] #결과 저장할 배열 선언
    count=0
    for i in range(len(b)):
        l=0
        a=0
        for j in range(11):
            if(info[j]<b[i].count(10-j)):
                l+=10-j
            elif(info[j]>=b[i].count(10-j) and info[j]!=0):
                a+=10-j
                #둘다 0이면 그냥 넘어간다.
        if(l<a):
            continue
        elif(l>a):
            #라이언이 이기는 경우 중에서도 최대 점수차이가 나올때만 업데이트.
            if(count<l-a):
                count=l-a
                c=b[i]

        else:
            continue
    answer=[0,0,0,0,0,0,0,0,0,0,0]
    #결과 배열이 비어있으면 -1 리턴.
    if(len(c)==0):
        return [-1]
    #결과 배열의 값을 answer배열의 인덱스로 사용해서 답 작성.
    for i in range(len(c)):
        answer[10-c[i]]+=1
    return answer

특이사항

  • 둘다 0이면 점수를 세지 않는 조건을 생각하지 않아서 몇번 틀림
  • 그리고 조건중에 “같은 점수일경우 적은 수의 과녁을 더 많이 맞힌 경우를 우선한다”라는 조건이 있었는데 딱히 신경안써도 통과해서 왜 그럴지 고민함
    → 고민한 결과 조합을 함수로 구했을 경우 배열의 앞쪽부분을 순서대로 먼저 조합으로 구함. 즉 arr이 0,1,2..순서대로 시작했기 때문에 0,1,2..순서대로 많은 조합부터 구한 것!
    그렇기 때문에 코드에서는 점수가 똑같을 경우를 생각 안하고 클때만 바꿨지만, 결국 점수가 같을 경우를 체크해도 앞에 나온게 무조건 우선일 수 밖에 없다. (상대적으로 낮은 번호의 수가 더 많기 때문에)

+ Recent posts